Good Painting Procedures – Chapter 4: Painting Control & Important Points for Good Paintwork
Painting Control
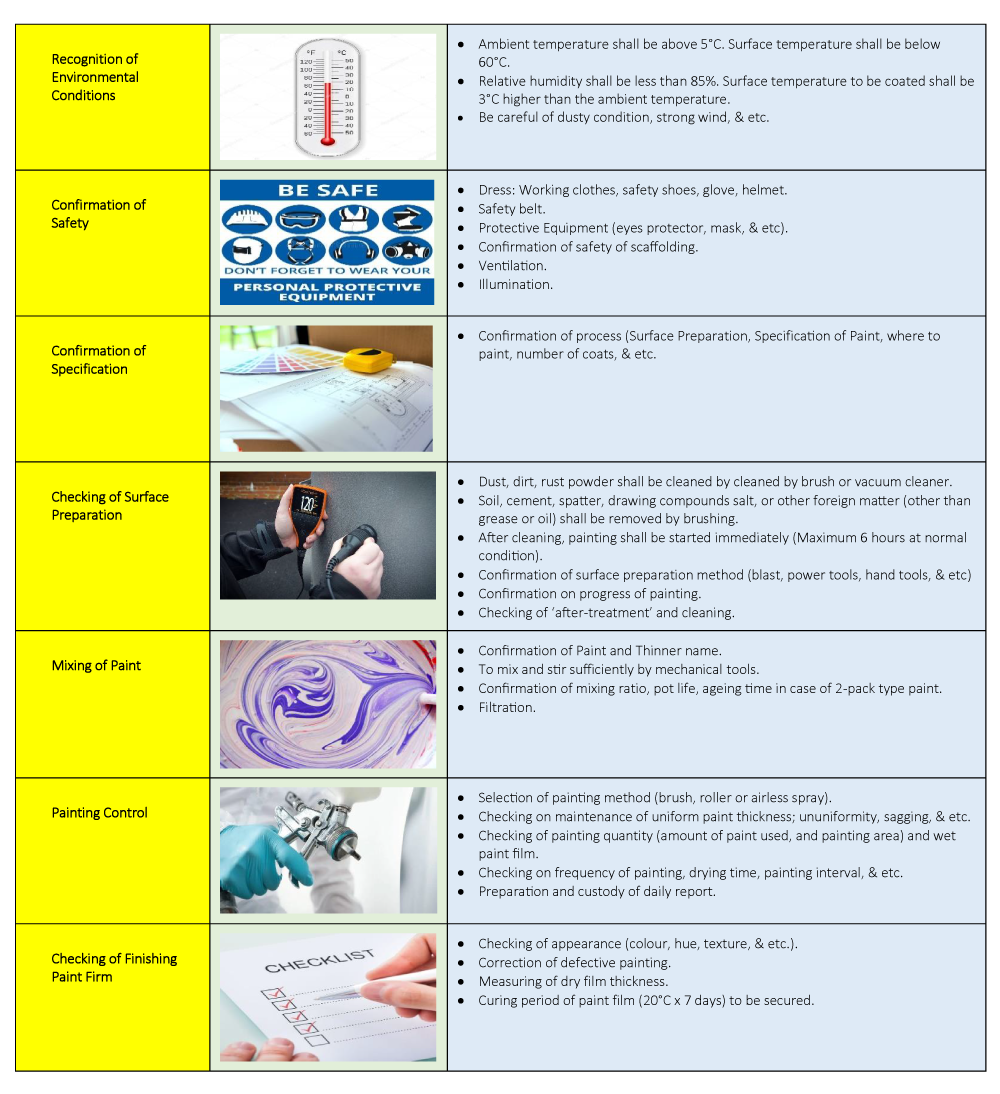
Painting control involves a process of systematic checks prior to, during and after painting in order to ensure a high standard of painting job done. These include:-
- Recognition of Environmental Conditions;
- Confirmation of Safety;
- Confirmation of Specification;
- Checking of Surface Preparation;
- Mixing of Paint;
- Painting Control;
- Checking of Finishing Paint Firm.
Requirements of Painting Control
Common Paint Checks
Test Sample
It is often a good practice to test a sample of the proposed paint system prior to large scale painting (usually at the site) in order to check and confirm the following:-
- Appearance – Sample should indicate visually the ability of the system to give the expected colour and uniformity.
- Surface Preparation – This is to establish the required standard and level of surface preparation.
- Compatibility – Compatibility of the paint system and substrate in terms of colour and adhesion should be checked.
- Durability – If time permits the sample should be tested under and subjected to actual site conditions. This would test the performance of the paint system.
Coating
To assist in determining the number of coats that have been applied, it is common to use different colours for each coat to distinguish the Sealer / Primer, Undercoat and Topcoat from each other. Preferably the colours selected for the Primer and Undercoat should be of lighter colours and shades than the Topcoat.
Adhesion Test
Scotch tape can be used to stick on the painted surface to be tested and pulled off to see if any paint is removed. The paint should however be fully cured before the test is conducted.
Film Thickness Checks
Metals: Apart from the type of paint used, the paint system’s ability to protect the metal from corrosion is also dependent on the thickness of the paint film. This thickness can be measured with a gauge which is either a magnetic or electrical type. The latter is more accurate and can measure film thickness on both ferrous and non-ferrous surfaces.
Masonry: In some instances, a cross-section of the paint may be cut from the wall for examination to determine the coating thickness and number of coats that have been applied. This visual inspection is conducted by a qualified technician under a special microscope for analysing paint film.
Water Solubility Test on Putty
Putty is a very important base material for paint to be applied on. Inferior quality putty will result in paint defects occurring such as peeling and flaking. The following checks can be done:-
- Allow ample drying of putty that has been applied.
- Spray water onto the dried putty and observe. Check to see if putty softens or disintegrate. The degree of solubility is an indication of its quality and stability.
Quality of Paint
Sample may be taken and sent to independent testing laboratories such as SIRIM for tests on dilution and compositions.
Important Points for Good Paintwork
Surface Preparation
- Substrate to be painted (whether masonry, wood or metal substrate); must be clean, dry and free from dirt, dust, oil, grease and other contaminants, prior to painting.
- Inadequate preparation of surface will result in failure of the paint system used.
- For repainting, if a different paint system is specified, it is important to verify the compatibility of the paint system.
- Only when the proper surface preparation has been implemented (whether masonry, wood or metal substrate), can the appropriate painting system be effective.
- Moisture level should be monitored before painting; On Masonry, not more than 16%. On Wood, not more than 20%.
- Check Alkaline level of the wall with pH paper. Recommended level is between 6 – 9.
Masonry Walls / Cement Substrates
New Unpainted Walls
- Allow the plaster to adequately dry / cure before painting. A minimum of 28 days is normally required provided there is adequate ventilation (for interior).
Old Painted Walls
- Use high pressure water-jet washing to remove dirt, fungus and algae, powdery substances and unstable paint film or other foreign matter.
- Scrape off any stubborn substances on the substrate, if necessary.
- Hairline cracks and other minor surface imperfections should be filled and smoothened out with an appropriate Acrylic-based putty.
- Cracks over 1mm should be hacked in a V-shape and patched with either a cement-based or an appropriate Acrylic-based putty.
- Ensure that substrate is free of any sources of leakage / water seepage. i.e. bathroom / kitchen pipes where water may seep into adjacent wall; weak bathroom tiles / flooring where water may seep through, causing unsightly stains or marks on the ceiling directly below.
- If the water table is too high, causing continuous rising dampness and high moisture, through the flooring or the walls, waterproofing experts should be consulted.
Wood / Timber Substrates
New Unpainted Wood Substrates
- Sand wood and fill up gaps and other minor surface imperfections on the wood grains, with a non-water soluble filler or putty.
- Wipe with a tack cloth before applying the first coat of paint.
Old Painted Wood Substrates
- Sand wood lightly for better adhesion of the paint. Unsound, aged or rotten wood fibres should be removed.
- Defective paint films should be stripped off with a solvent-type paint remover.
- Scrape off unstable matter, as this may cause subsequent coats of paint to be unstable.
Metal Substrates
New Unpainted Metal Substrates
- Remove millscale, dirt , grease, oil, fungus and other foreign matter before painting. Type of surface preparation should be based on the paint manufacturer’s recommendations.
- Ferrous Metals – Prevent rust by immediately applying a coat of rust-inhibitive primer.
- Non-Ferrous Metals – i.e. Aluminium, Galvanised Steel. Apply one coat of Etching Primer to ensure adhesion of subsequent coats.
Old Painted Metal Substrates
- Sand metal lightly to improve adhesion for subsequent coats of paint.
- Corroded metal parts as well as unstable paint films should be scraped away with either sandpaper or power wire-brush
- Apply Rust-Inhibitive Primer or Rust Converter to affected areas and spot-prime peeled off paint film before applying the appropriate painting system.
Paint Systems
In summary, the following presents the normal painting system for both new painting and repainting work. In essence, before proceeding to paint, keep the surface dry, free from dirt, oil, grease, fungus and unstable foreign matter prior to painting. Scrape off unstable paint film and apply the appropriate Sealer / Primer to the affected area. Lightly sand existing stable paint film and fill up surface imperfection with an Acrylic-based Putty.
New Painting
Masonry Substrates
- Alkali-Resisting Sealer (1 coat)
- Topcoat (2 coats)
Wood Substrates
- Aluminium Wood Primer (1 coat)
- Undercoat (1 coat)
- Topcoat (2 coats)
Ferrous Metal Substrates
- Rust-Inhibitive Primer (1 coat)
- Undercoat (1 coat)
- Topcoat (2 coats)
Non-Ferrous Metal Substrates
- Etching Primer (1 coat)
- Rust-Inhibitive Primer (1 coat)
- Undercoat (1 coat)
- Topcoat (1 – 2 coats)
Repainting
Masonry Substrates
- Alkali-Resisting Sealer (Spot-Prime)
- Topcoat (2 coats)
Wood Substrates
- Aluminium Wood Primer (Spot-Prime)
- Undercoat (1 coat)
- Topcoat (2 coats)
Ferrous Metal Substrates
- Rust-Inhibitive Primer (Spot-Prime)
- Undercoat (1 coat)
- Topcoat (2 coats)
Non-Ferrous Metal Substrates
- Rust-Inhibitive Primer (Spot-Prime)
- Undercoat (1 coat)
- Topcoat (1 – 2 coats)